Fully automated crimp monitoring for spindle drives
Initial situation:
Proper monitoring of crimp connections can significantly improve the quality and reliability of spindle drives in vehicles.
Electric tailgate systems open and close the trunk lid automatically using an electric spindle drive. Originally installed exclusively in luxury and luxury class vehicles, these drives are now also being used in medium-sized and small cars due to increasing demand for greater convenience.
The electric spindle drives in the trunk of a vehicle are designed so that their metal housing is crimped. Crimping is a technique in which two or more parts are positively connected without having to be soldered or welded. The material is bent or formed in the process. The spindles have specific crimp patterns and the quality of these crimps is crucial.”
The crimp connections on the spindle axles in the trunk of a vehicle fulfill several important functions:
- Reliable connection: Crimps help to securely fasten components and ensure a strong and stable connection. This is particularly important in the automotive industry, where there is a lot of vibration and movement.
- Durability: Properly crimped connections last a long time and withstand the harsh conditions in the trunk of vehicles, such as temperature fluctuations and moisture.
Problem: Manual measurement
When operators use mechanical probes or special tools to measure crimp depths, spindle diameters or crimp positions, this poses various challenges:
- Human error: Manual measurements are prone to error. Operators can exert different forces on the caliper during the measurement, read the scale incorrectly or position the caliper incorrectly, resulting in inaccurate measurements.
- Consistency: Different operators may measure the same crimp differently, which can lead to inconsistent results and quality control issues.
- Efficiency: Manual measurements can be time-consuming, especially for large quantities, which can slow down the production process.
- Precision: Calipers may not be the most accurate tool for measuring crimp depths and sizes, especially for very small or complex crimps.
New solution approach from QuellTech: 3D laser scanner inspection of crimps
QuellTech presents an innovative solution: the inspection of crimps using 3D laser scanners. A sophisticated device has been designed to facilitate the rotation of the scanner around the manufactured component. The scanner performs a precise 360-degree rotation around the component, capturing data points and generating a detailed 3D point cloud. Thanks to its flexible mounting field, this device can capture a wide range of components.
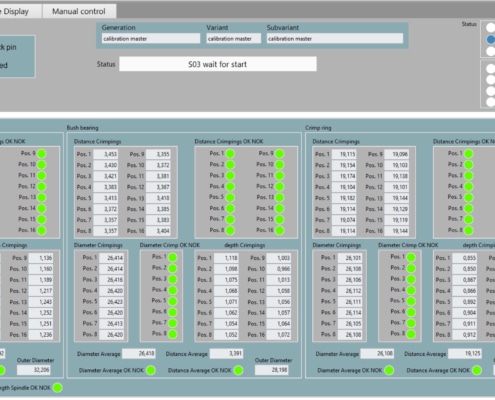
Once the assembly process is complete, the specifications for each variant are transferred to the QuellTech software via a PC-based control system, as the tolerances and nominal values can vary between variants. The user can adjust these values as required via a user-friendly front end.
The results of the scan and the “pass/fail” status are immediately visualized on the display and documented for later analysis. A blue laser diode was chosen for this use of a laser sensor as it enables minimal noise development and precise line guidance. The tolerance values for features to be inspected are between 0.050 mm and 0.150 mm, and high repeatability requirements are met.
In order to exclude the influence of the test piece during the measurement, the scanner rotates more than 360° around the test piece during the measurement. This ensures that the centers of the components are correctly aligned for each scan. In addition, special algorithms have been developed for different components to take into account their individual shapes, distribution, position and size of the crimps. The required measuring equipment capabilities are determined and verified for each test feature using DAkkS-calibrated zero masters. The measuring equipment capability is checked with the zero master at fixed time intervals.
Advantages of the QuellTech solution for crimping:
- Precision: Laser scanners can measure with a high degree of precision
- Productivity: Laser scanners can check all the crimps on a spindle much faster than a human operator, which improves the productivity of the production process.
- Reliability: Laser scanners provide reliable measurements and eliminate the fluctuations that can occur with different operators.
- Non-destructive: Laser scanners are non-destructive measuring tools, i.e. they can measure fragile or soft materials without causing damage.
- Data acquisition: Laser scanners can generate detailed data for each measurement, which can be used for further evaluation and quality control.
- Lower labor costs: After an initial investment, inspection costs can be reduced in the medium term.
- Ability to measure complex shapes: Laser scanners can measure complex shapes and geometries that would be difficult to capture manually. Developing specialized measurement tools for each variant could also be expensive.
In summary, 3D laser scanner inspection is a precise, efficient and safe alternative to manual inspection of crimps.
This crimping solution with QuellTech laser sensor technology was realized and implemented together with our valued long-term integration partner:
SPIE KAT
Kraus Automatisierungstechnik GmbH
Ottostrasse 4
D-97437 Hassfurt
Contact person: Stefan Besendorf
Phone: 09521-618133
kat-gmbh.de
You are currently viewing a placeholder content from Facebook. To access the actual content, click the button below. Please note that doing so will share data with third-party providers.
More Information

 Conveyor belt